Sunday, September 18, 2011

Birthday Card with Button Brads

Hey all! Sorry it has been a while since I've posted - haven't had too much time to craft in the last week.  Last night I made this birthday card for my FMIL (future mother-in-law) whose birthday is tomorrow.  I wanted it to be fairly simple, but my fiance had seen the inside sentiment online and we had to add it in!

Materials needed:
Base Card
Brown Kraft Cardstock
Yellow and white twine
Patterned Ribbon
Pebbles Inc. Chalk
Foam pop-up squares
Glue Glider Pro
Edge Rounder
Terrifically Tacky Tape
Cuttlebug
Cuttlebug Kassie's Brocade Embossing folde
Inkjet printer and tape.
Cricut Cartridges: Cricut Classic Font (Rectangles and Circle), Lacy Labels (inside)


I used my Gypsy to put the circled inside of the rectangle before cutting.  I then chalked all the edges and ran the smaller rectangle through my Cuttlebug.  I used my GlueGlider to attach the larger rectangle to the pre-made card base.


I used an assortment of sizes and colors of brads from the same set on the leftover circle.  I attached it to the card base using Terrifically Tacky tape.  I used the GlueGlider to add the decorative ribbon and just tied the twine around a few times before finishing it in a bow.


I attached the rectangle situating it over the circle with pop-up squares to give it dimension.


After cutting out this shape I taped it to a piece of paper and ran it through my inkjet printer to add the sentiment.  I then chalked the edges and attached it with pop-up squares.

What do you think?
Carla

Thursday, September 8, 2011

Anything Goes Blog Hop Giveaway WINNER!

Hey all! I'm very excited to announce the winner of my first ever Blog Hop Giveaway! We had 24 total entries and the winner is...

#2 - terri142!
Terri142 said "Wow the card is great! You did a great job with the tractor pop-up part. Thanks so much for the chance to win."

Congratulations Terri142 - you already left your e-mail address so I will be contacting you this weekend sometime (you will have to bear with me - I'm in a wedding Saturday) to get your shipping information!

Thank you so much to all my new followers - I look forward to sharing my projects with you all!

Carla

Wednesday, August 31, 2011

Grandparent's Day Card and Anything Goes Blog Hop and Giveaway!

Welcome to the Anything Goes Blog Hop celebrating the one year Blog Birthiversary of our hostess Stephanie from Once Upon a Paper! You should have come here from Ali at Scrapping with Alicat.  If you didn't come from her - you can start over at the beginning of the hop at Once Upon a Paper. Stephanie is celebrating her Blog Birthiversary with Seven Days of Giveaways so make sure you check out her blog each day for the next week!

My creation for the Blog Hop is my very first Grandparent's Day card for my fiance's grandfather with is 91 years old! We never celebrated Grandparent's Day in my family, but my (almost) grandfather-in-law has been very sick for a few months and I know this card from me, my fiance, and his sister will put a smile on his face!

Materials needed for this project:
Card stock in blue, green, white, red, brown, yellow, orange, black, silver, and bright yellow.
Glue
Pebbles Inc. Metallic Chalk in silver
Pebbles Inc. Regular Chalk in various colors
Martha Stewart Fringe Scissors
Martha Stewart Bone Folder and Scoring Board
Inkjet Printer
GlueGlider Pro
Cricut Cartridges: Pop-Up Neighborhood (Inside tractor, card base, barn, and tree), Just Because Cards (sun), Jubilee (banner), Jasmine (rectangle for grass)


I wanted to make this card look a little like home for my grandfather-in-law since he is currently in a nursing home for the first time in his life. He owns a farm in rural Kansas so this scene seemed fitting.  I cut all the images on the front of the card and chalked all of their edges with normal Pebbles Inc. chalks.


I used Martha Stewart Fringe Scissors to cut the grass. I then glued down on all of the pieces except for the grass, which I used my GlueGlider Pro to attach.  After completing the front of the card - I used my bone folder and scoring board to score both the blue base and the inside white base and used my GlueGlider to attach them.


The inside was the tricky part - I have never made a pop-up card before, but decided to give it a go.  After cutting all of the pieces and chalking all of the edges (I used the metallic chalk on the middle of the tires) I glued together the tractor.


I wanted to show you what the tractor looks like cut out before you have folded anything or added anything to it.  Sorry that it is in a different color - I didn't think to add a picture of this stage until I was trying to explain the next few photos!


The tractor cuts in one length of a piece and you have to glue it together to make kind of a square with it.  Then you fold the edge pieces inward so it will close correctly.


I used my Cricut to cut the banner and then taped it to a piece of white paper and ran it through my Ink Jet printer to print my sentiment on it.  I used this process because I don't own a stamp that says "Happy Grandparent's Day!" and it seemed a little silly to buy one for 1 card.


The little flaps you see above just have to be folded in from the tractor length cut and have glue added to them.  You center them over the middle of the card and attach!

Also, I am excited to announce my very first Blog GIVEAWAY! I will be stuffing a USPS Flat Rate Box full of embellishments and other goodies!
The rules are:
1. You must be a follower of my blog.
2. You must leave a comment on THIS POST by next Thursday, September 8th at 5 PM.
3. If you add a post about this Blog Hop and my giveaway on your blog you can leave a second comment for another entry into the giveaway letting me know that!
4. When I post the winner next Thursday night you must respond to that post with your information by Sunday night or we will redraw!
I am going to use Random William (my fiance) instead of random.org - mainly because it seems more fun.  I will put all the eligible numbers into a bowl and let him pick one then post a photo of him with the winning number!

Thank you for stopping by my blog! Your next stop is Amber at My 3 E Scrapbooking. 

In case you get lost along the way, here is the entire line up:
1. Stephanie at Once Upon a Paper
2. Kristy at Craftin' on my Door
6. Michele from Green Girl Scraps
8. Carla from OCD Scrapology <---- you are here now
9. Amber from My 3 E Scrapbooking
10. Cassie from Scrappin' Palace

Thanks for joining me on my very first Blog Hop! What did you think of the card?

I am also linking this card up to the Thankful Thursday Grandparent Challenge.

Carla

Saturday, August 27, 2011

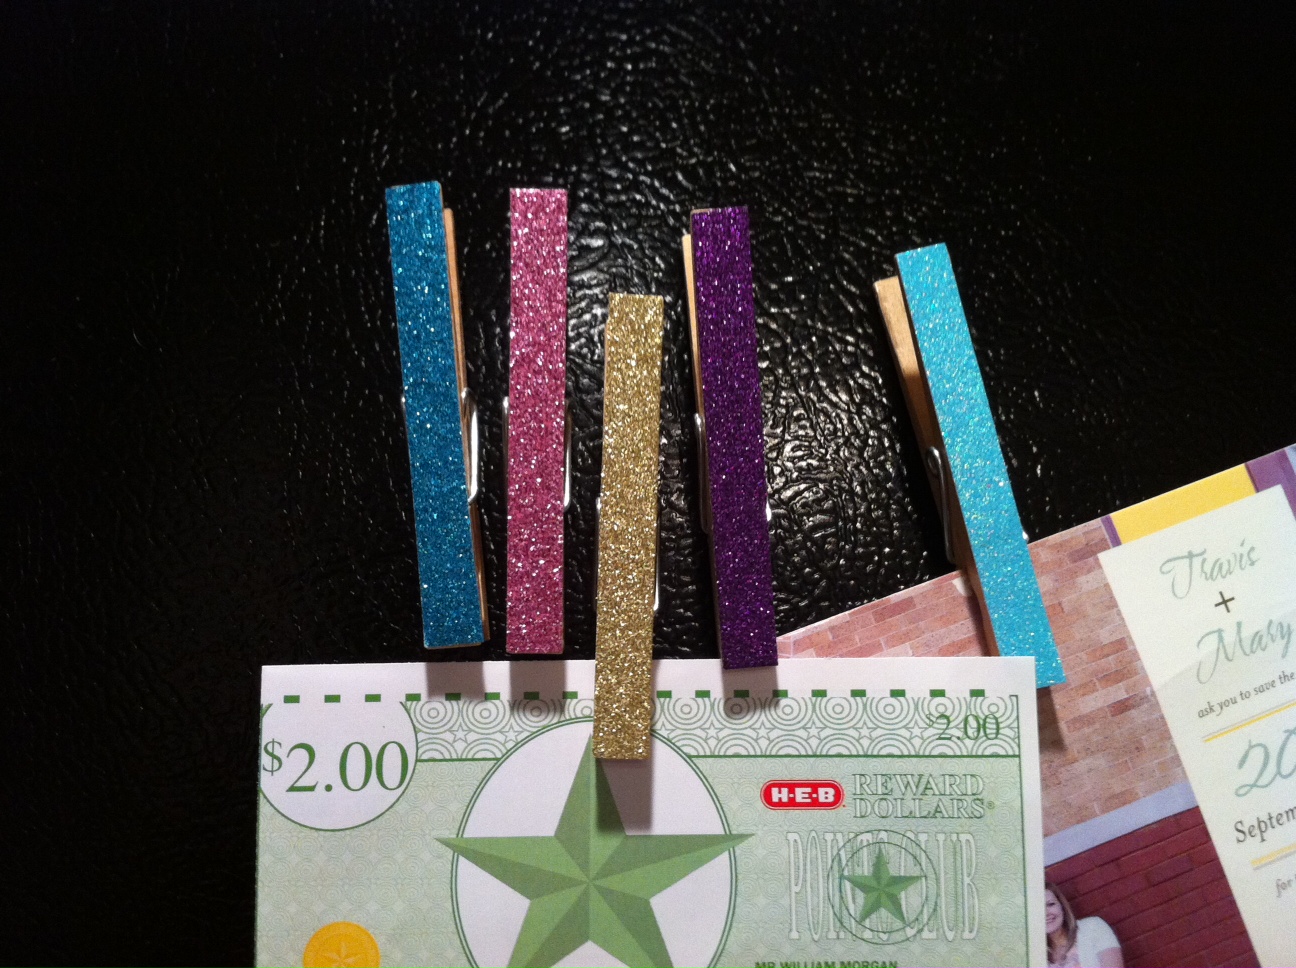
Glitter Clothespin Magnets

Hey all! Today I have a VERY simple craft that I made after seeing the idea on Pinterest (again, it's addicting - you should go try it and follow me!)

Materials needed for this project:
Clothespins
Magnets
Scrapbook Paper (Mine is glittery)
Scissors
ModPodge and small paint brush
Hot Glue Gun and Sticks
Spray Acrylic Sealer


Sorry I don't have photos of the process, but you start by tracing your clothespin onto the back of your paper and cutting out the rectangle.  Use the paintbrush to apply ModPodge onto the clothespin and attach the paper rectangle. 


Once it is dry - use a sealer (I mainly did this so the glitter wouldn't get anywhere) to seal the paper on.  Flip over your clothespins and add a dot of hot glue then place your magnet on top of it.  Press down on the magnet and make sure it is on well.


The finished product is not only a magnet, but it actually holds your papers in the clip too :) What do you think?

I also wanted to let you all know that I will be participating in my very first Blog Hop on September 1st.  You can find all the details on it from our host, Stephanie at Once Upon a Paper.  She is celebrating her Blog's First Birthday with this Blog Hop and is having a week's worth of giveaways!
Carla

Friday, August 26, 2011

Setting Up New Craft Room - LOVE letters

Hey all! Another room set up project - this one VERY easy.  I bought a magazine storage system from Michael's (they were having a buy 1 get 1 for a cent sale on the storage cubes I like)  and after getting it hung on the wall wanted to dress it up a little bit.  I found the letters I used at Hobby Lobby (about $2.50 a piece) they are light, but have large bases so they stand up on their own.

Items needed for this project:
Letters of your choice
Martha Stewart Pearl Paint (mine is purple)
Paint brush


I forgot to take any photos before or during the project, but here is the finished result! The letters look different colors because of the pearl paint - when the light hits the paint it looks very nice!  This is hanging on the wall that is behind me while I am working!

I will post more photos of my room as it comes along, hopefully it will be done by the end of next week.

What do you think?

Carla

Thursday, August 25, 2011

Setting Up New Craft Room - Window Valence

Hey all! This week I have been setting up and decorating my new craft room - I still have a long way to go, but it has been fun to get started! The first major project was decorating my window - I wanted to create a window valence to dress it up a little!

Items needed for this project:
Wood (Sizes depend on the size of your window, but mine is 6 inches tall)
Screws and screwdriver
Staple Gun
Batting
Fabric
Way to hang it up!


I screwed three pieces of wood together - all pieces are 6" tall and 1/2" thick.  My fiance did this part :)


Here is another view of the boards screwed together!


After using the staple gun to attach the batting (mine has 4 layers of it) I used the staple gun to attach the fabric I chose.  I actually used the coordinating valance (pictured above) instead of buying a different fabric.


Here is what the window looked like before - so blah! (sorry I really need to steam the curtains!)


Here is what the window valence looks like when it is dark out (so there is no light coming through the window).


here is the window with some light coming through.  What do you think?

Carla


Monday, August 22, 2011

It's Been a While...

Hey all! It has been a while since I've posted - sorry about that! I have been on vacation for the last week, and right now I am separated from my Cricut machine.  I will have it back this weekend and will be setting up a new crafting space as well.  Be looking for new posts with projects and photos of my new space!

Carla