Friday, November 11, 2011

Cricut Circle Magazine Challenge - Sketch

Hey all! I made this card for one of my friend's birthday.  I decided to make it for the Cricut Circle Magazine Challenge this month as well.  This  month the challenge was to use a sketch that was featured in the magazine and at least 3 Cricut sketches.

Materials needed:
Assorted Papers
Pre-made Card Base
Glue
Pop-Up Sticker Squares
Embossing Powder (Zing - Metallic Teal) and Embossing Ink
Heat Embosser
Cricut Cuttlebug and D'vine Swirl Emboss Folder
"Happy Birthday" Stamp
Silver Ink
Pebbles Inc. Chalk
Cricut Cartridges: Jasmine (Rectangles), Sweet Treats (Cupcake), Circut Classic Font (Circles, Heart), Storybook (Inside)


I had a hard time choosing the papers for this one, but settled on these hoping that they wouldn't turn out looking too busy.


The very back paper is a pre-embossed paper form Bazzill Basics.  I chose to glue everything down instead of trying to "pop" the background items because I didn't want it to get too busy.


I used the heat embosser and Zing powder to emboss the top of the cupcake (essentially the "cherry") and the embossing folder to do the base.  After gluing all the pieces together I used to Pop-Up Stickers to attach it.


I used the embossing folder to emboss the red circle and chose to glue it backwards so that the embossing is going down instead of up.  I then glued all of the pieces on top of each other instead of using pop-up stickers.


I used silver ink to stamp the sentiment inside.  I thought the front was too busy to add words as well.

What do you think?

Carla

Thursday, November 10, 2011

Fall Home Decor - Cricut and Vinyl and a Pinterest Project!

Hey all! This week I did a little fall decor project for my apartment.  I got the idea for it from Pinterest and added Cricut Vinyl to make it a little more "fall".  Also, for all of you on Pinterest - I have added a button to the right where you can follow me - you can choose to follow all my boards or just some of them (I have one dedicated to crafts and one to cards) - I hope you have a good time going through my boards!

Materials needed:
Brown Vinyl
Cricut Cartridges: Songbird (M), Gypsy Wanderings (Leaves)
Fillers: Corn, Red Beans, Peas


This is the original photo I saw on Pinterest - I liked that it used natural (and cheap) materials for decoration!


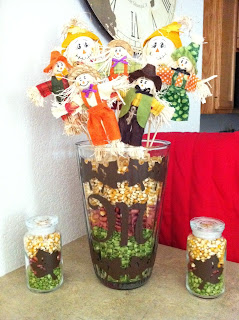
This is what I came up with.  I bought the little people at Michael's last week in the clearance section for about 75 cents a piece.


I used my Gypsy to size the cuts - the leaves are the border option from the single leaf that is on the overlay of Gypsy Wanderings.


This leaf is not the original on the cartridge - this is the flipped image.  I wanted the little canisters to be mirror images of each other.


This leaf is the original image from the cartridge cut in brown vinyl.


Another overall view of my little fall corner! I am hopefully going to be making another project for this area tonight to add some more "fall" feel to my apartment!

What do you think?

Carla

Saturday, October 29, 2011

Halloween Home Decor

Hey all! I actually made this project last week, but after having surgery I'm just now getting around to posting it!  I made a little Halloween Home Decor Project for the Cricut Circle Monthly Challenge. The Challenge: Create a Halloween Home Decor project! Your project must include atleast 2 different Cricut Image Cuts.

I made it into a whole little corner on the bar in my apartment complete with some decorations my FMIL sent me in a Halloween goody box!

Materials needed:
Papers: Chipboard
Paints: Black, Martha Stewart Glitter Purple and Martha Stewart Glitter Orange
Paint Brushes
Pop-Up Stickers
Hot Glue Gun and Glue
Craft Pumpkins (bought mine at Michael's for half off)
Cricut Cartridges: Storybook (Letters)


I started by cutting the letters for "BOO" in both shadow and regular features.


I then painted all the letters black.  Once they were dry I added the purple paint on the shadow letters and the orange paint on the regular ones.


I used the Pop-Up Squares to attach the letters to each other.


I then used the hot glue gun to add them to the pumpkins!

Some up close pictures:


For these guys I just ran a piece of orange paper through a shredder!


I am happy with how it came out - and once Halloween is over I will be able to pack it all up and use it again next year since the pumpkins are fake!

What do you think?

Carla

Friday, October 14, 2011

"Our Stories" Layout - Circle Challenge

Hey all! I made this layout today for the Cricle Circle Magazine Challenge.  This is a layout I have been meaning to make for a while, it is going in my engagement/wedding planning scrapbook and has the story of how me and my fiance met - from each of our perspectives! It is so funny how we see things (and remember things) differently! Contest Rules: Use any Echo Park Collection and at least 4 Cricut Cuts from your favorite cartridge in your design.

Materials needed:
Papers: Echo Park Victoria Garden Collection: Garden Gate, Sunshine, Botanical Ballad, and Journaling Cards
4 buttons
Terrifically Tacky Tape
Pop-Up Stickers
Glue
Twine
Inkjet Printer
Cricut Cartridges: Sweethearts (Corners, His & Hers), Lyrical Letters (Rectangles)


I had a hard time with putting no pictures on this layout, but I chose to use papers that were heavily patterned to try to offset that.


I cut out the rectangles for my paragraphs and used their dimensions to dictate how much writing I could do.  I printed the paragraphs then taped the rectangle on the right spot and ran the same page through the printer.


I added some twine and buttons for embellishment before gluing them to the larger rectangles so they will stand out.


I used pop up stickers to add the title "His and Hers" which I thought was cute and appropriate for the page!


I played with the idea of popping the corner details as well, but my fiance wanted me to glue them straight down so I did.  I love the delicate details on them!

What do you think?

Carla

Wednesday, October 12, 2011

Thinking of Ewe - Sketch Challenge

This is the final project I made for the Cricut Circle Blogiversary Challenge Series.  I decided to use it to make another card for my fiance's grandfather - we visited him a few weeks ago and he had my other cards hanging up in his room to show off.  I wanted to make another to bring him some happiness - letting him know we are thinking of him.  The Challenge: Create a project of your choice using the sketch below. Your project must include atleast 2 different Cricut Image Cuts.

Materials needed:
Base Card (or white paper and cut your own)
Papers: Shiny Blue, Pre-embossed blue, Blue and White Dots, Orange, Yellow, White, Black
Pebbles Inc. Chalk - orange and gray
3 buttons
Terrifically Tacky Tape
Pop-Up Stickers
Inkjet Printer
Cuttlebug
Cuttlebug Folders: D'Vine Swirl
Cricut Cartridges:  Cricut Classic Font (Rectangles, Circle), Just Because Cards (Sheep, Sun)


Here is the sketch I had to use for this challenge - pretty simple!


After cutting all the pieces - I attached the main rectangle to a pre-made card base.


I used an inkjet printer to make the sentiment on this card - I jammed up my printer 4 times before I got it to work!


After gluing together the sun piece I used my Cuttlebug and D'Vine Swirls folder to emboss it.


I used Terrifically Tacky Tape to add the 3 buttons.


I chalked the edges of the yellow circle and the edges of the sheep.  I added the sheep with pop-up stickers and glued the circle down to the card.


I hope it brings a smile to his face - what do you think?

Carla

Project Display Board - Circle Exclusive Cartridge Challenge

This is the project I am most excited about from the Cricut Circle Blogiversary Challenge Series! I chose to make a board to display my work on! The Challenge: Create a project of your choice with one or more of the Cricut Circle Exclusive cartridges! (French Manor, Shall We Dance, Cricut Everyday, Pop-Up Neighborhood, or Sophie) Your project must include atleast 2 different Cricut Image Cuts. And YES! You can mix in other cartridges with your Circle Exclusive cartridges.

Materials needed:
Clipboard
Papers: Green Glitter, Green, Pre-Embossed White
Pop Up Stickers
Mod Podge
Paint Brush
Cricut Cartridges: Cricut Everyday (Bugs, Scrapaholic), Elegant Edges (Scalloped Circle)


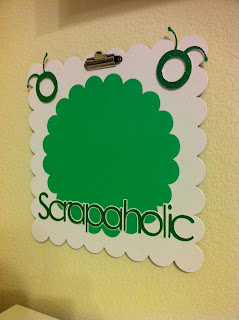
I cut all of my images and glued together the "Scrapaholic" pieces (I cut the main and a shadow).  I set it aside and added the green scalloped circle with Mod Podge and used to Mod Podge to add the "Scrapaholic".  I then covered the whole board with Mod Podge to seal it.


I used my Gypsy to flip the Cricut Circle Bug Head so I could put one on each side.


I then used pop-up stickers to attach the Cricut Circle Bug Heads.


Here is what it looks like hanging on the wall next to my craft area - what do you think?

Carla

Birthday Card - Monochromatic Scheme Challenge

Another project for the Cricut Circle Blogiversary Challenge Series! I decided to make this one for my sister's birthday (which is amazingly months away still!) The Challenge: Create a project of your choice using a monochromatic color scheme. Your project must include atleast 2 different Cricut Image Cuts.

Materials needed:
Base Card (or white paper and cut your own)
5 different shades (or patterns) of 1 color paper
Buttons in 2 sizes
Twine in 2 colors
Terrifically Tacky Tape
Stamp
Ink (I used chalk ink)
Glue
Cricut Cartridges:  Cricut Classic Font (Rectangles), Elegant Edges (Sentiment)


I started by finding all of these wonderful papers, then cutting them all! I glued everything together but the light colored paper.


I fed the twine through each button doubling it up.


I then inked on the sentiment of "Have a Great Birthday!" and glued on this piece.


Lastly I attached the buttons with Terrifically Tacky Tape (I have found that it works best for adding buttons) and then it was all done!

This card was SO simple, but I like the outcome - What do you think?

Carla

Masculine Birthday Card - Cuttlebug Challenge

This is the next project I created for the Cricut Circle Blogiversary Challenges.  This is a birthday card for my dad that I tried to make masculine - it is difficult sometimes! The Challenge: Create a project of your choice using your Cuttlebug machine as the main focus. Your project must include atleast 2 different Cricut Image Cuts.


Materials needed:
Base Card (or white paper and cut your own)
Brown Kraft Cardstock, Navy blue Cardstock, Gold Cardstock, Wood Patterned Paper
Pebbles Inc. Chalk - brown
Glue Glider Pro
Glue
Cuttlebug
Cuttlebug Folders: Kassie's Brocade, D'Vine Swirl, Swiss Dots
Cricut Cartridges:  Cricut Classic Font (Rectangles), Elegant Edges (Bottom of Blue Rectangle), Home Decor (Stars)


This is the card as a whole - I embossed the main card with the Swiss Dots folder.


After cutting this rectangle I embossed it with Kate's Brocade and then attached it with glue.


I used my Gypsy to weld together a rectangle and the other shape to make the navy piece you see.  After cutting it I embossed it with D'Vine Swirl and attached it with glue.  I then glued the stars on top.


I inked to edges of this oval and stamped on the "Happy Birthday!" then glued it on last.

What do you think?

Carla

Engagement Photo Layout - Recipe Challenge

Hey all! Wow - it has been quite a while since I have posted anything - I have had a hard time finding the time to craft! I am about to post a lot of projects in a row - I have been crafting like crazy for the Cricut Circle Blogiversary Challenges!  The rules for this challenge: Use your Cricut machines to create a project using the following “recipe.” It must contain 1) A Title; 2) At least 2 Cricut Cuts, and 3) Atleast 3 buttons. 

Materials needed:
Papers: Blush Pink, Bright Pink, Patterned Silver/White, Black, White, Patterned Gray/Black
3 buttons
Twine
Terrifically Tacky Tape
Regular Tape
Pop-Up squares
Glue
Cricut Markers
Inkjet Printer
Cricut Cartridges:   Lyrical Letters (Rounded Rectangle), Cricut Classic Font (Rectangles, hearts) , Elegant Edges (Scallop), Damask Decor (Drawing), Songbird (Lucky in Love)

I used the recipe to make a layout from my engagement photo session last November.  I used the Cricut Markers to draw on the image to the blush pink background paper - most of it is covered up, but I like the detail it gives the top right corner.


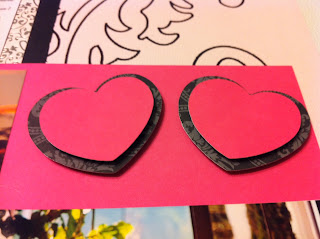
I cut these hearts from both colors and used pop-up squares to attach them to each other and to the layout to add some dimension.


I used my Gypsy to weld together the letters from Songbird to create my title - "Lucky in Love".  It is a play off the day - we lucked out on finding our photographer for the engagement session (which took place on the beach in LA) - he is someone we won't be using for the wedding (since they are happening in different states) so we didn't really research him and just got lucky that our photos turned out so well!


I used my printer to add this journal about the day - just a little bit that will make us look back and laugh one day!


I also added some pink and white twine by wrapping it around the journal and taping it on the back,  I then added 3 buttons with Terrifically Tacky Tape.  

What do you think?

Carla

Sunday, September 18, 2011

Birthday Card with Button Brads

Hey all! Sorry it has been a while since I've posted - haven't had too much time to craft in the last week.  Last night I made this birthday card for my FMIL (future mother-in-law) whose birthday is tomorrow.  I wanted it to be fairly simple, but my fiance had seen the inside sentiment online and we had to add it in!

Materials needed:
Base Card
Brown Kraft Cardstock
Yellow and white twine
Patterned Ribbon
Pebbles Inc. Chalk
Foam pop-up squares
Glue Glider Pro
Edge Rounder
Terrifically Tacky Tape
Cuttlebug
Cuttlebug Kassie's Brocade Embossing folde
Inkjet printer and tape.
Cricut Cartridges: Cricut Classic Font (Rectangles and Circle), Lacy Labels (inside)


I used my Gypsy to put the circled inside of the rectangle before cutting.  I then chalked all the edges and ran the smaller rectangle through my Cuttlebug.  I used my GlueGlider to attach the larger rectangle to the pre-made card base.


I used an assortment of sizes and colors of brads from the same set on the leftover circle.  I attached it to the card base using Terrifically Tacky tape.  I used the GlueGlider to add the decorative ribbon and just tied the twine around a few times before finishing it in a bow.


I attached the rectangle situating it over the circle with pop-up squares to give it dimension.


After cutting out this shape I taped it to a piece of paper and ran it through my inkjet printer to add the sentiment.  I then chalked the edges and attached it with pop-up squares.

What do you think?
Carla